Copyright 2001, T. Sheil & A. Sheil All Rights Reserved
The All Gauge Model Railroading Page presents

Collected Articles
(These collected articles deal with trains sold by the original Louis Marx company from the late 1920s until the 1970s. These do not apply to the new Marx Trains that have been in production since the 1990s)
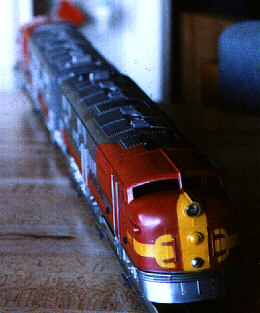
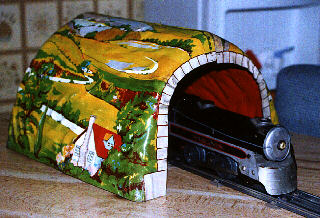
How would you like to have a genuine collectible train at bargain prices? The Original Marx trains are just that: antique electric trains at low cost. Though they have not been made in many years, they are available and they can cost less than their modern counterparts. You get an affordable train and a classic old-time toy. As an ironic twist, Marx probably sold more trains than anyone else.
Louis Marx was a genius, when it came to making toys. His expertise in tin lithography was notable. The Marx company made myriad different tin toys. Louis Marx also got into the train business. Initially, he sold the Girard Company's "Joy Line" for commission. Then, he had Girard make trains especially for his own company. Finally, Marx acquired Girard and started producing everything under the Marx name.
Back in the 1930s. Electric trains were toys. Scale models were scarce. Marx trains were more toy than model. They were small O Gauge trains, packed with O27 track. Stamped metal and tin litho locomotives came packed with an assortment of four-wheeled, tin-litho cars. Marx's trains were a bit smaller than Lionel or American Flyer, and they certainly sold for less. That was part of their success. A Marx train could be had for a fraction of the cost of those by larger makers. To boot, Marx trains were built to last. Though cheaper in cost, they were sturdy! Many collectors aver that it is easier to get a Marx train running than any other brand.
Part of the genius of Louis Marx was his urge to make things cheaper, yet maintain quality. He worked to improve his toys while cutting costs. This meant a lower price for customers, which meant more sales. One part of this was the Marx motor, an open-frame motor that was the basis of all the company's trains. Variations were few and subtle. A standardized motor made it easier and cheaper to make trains. It helped that this same motor is one of the most reliable ever made. Marx had his engineers improve it for better operation and more durability.
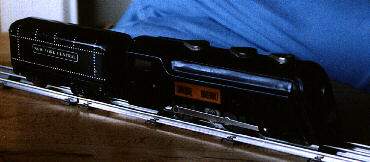
The trains of the 1930s were a blend of steam locomotives and streamliners. Marx produced its own versions of the popular trains of the day. These were stamped steel and tin lithographed toys all the way. One of the first was the Mercury, based on a New York Central streamliner. Soon after came the Commodore Vanderbilt streamlined locomotive, a design that remained in the catalogue for decades. The M10000 and M10005 streamliners of the Union Pacific were reproduced in several color schemes. So, too, were the stream-styles Canadian Pacific Royal Hudsons.
The cars they pulled were bright, attractive toys. There were boxcars, stock cars, gondolas and cabeese. Marx produced operating searchlight and crane cars. For the line side were operating crossing lights and signals, plus tin litho stations and switch towers. Marx trains offered the customer an assortment of products at very affordable prices. One could afford an entire Marx toy railway for the cost of one Lionel train set.
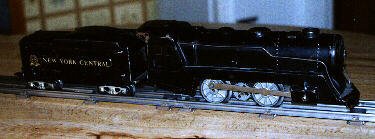
In 1938, A.C. Gilbert bought American Flyer and introduced a new idea: make a scale train for O Gauge. Rather than use the 1/48 that is native to O, Gilbert opted on a smaller 1/64 scale model. This would allow long cars to negotiate tight O-31 turns.
Louis Marx adopted the idea and began producing scale tinplate trains. The company did beautiful work, making affordable tin trains that were also scale models. To accompany them, the company produced a diecast locomotive, the 999. For its time, it was a remarkably realistic toy locomotive. The 999 was the most realistic locomotive Marx had made, and there would be more to come. Though manufacture of tinplate locomotives never ceased, the detailed scale models were about to explode onto the scene.
World War II interrupted toy production from 1942 to 1945. After the war, Marx continued developing its scale line. Tin litho diesels appeared, along with more scale cars and a larger diecast locomotive, the #666. Soon came the #333, a long, scale model of the popular Pacific type locomotive.
Marx started making scale in plastic. It wasn't long before freight cars and diesel locomotives appeared. The diesels used the same time-tested Marx motor, with different wheels. New plastic scenery kits and accessories popped into the catalogues.
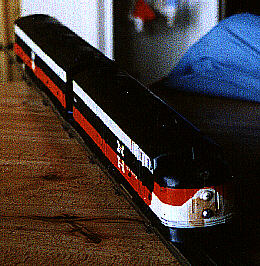
The Louis Marx company kept production going until the mid-1970s. Louis and his brother decided to retire, so they sold out to Quaker Oats. The new owner eventually sold them to a British firm, which later liquidated the Marx assets. Almost 50 years of Marx trains ended. In the 1990s, a "new" Marx Trains was started to make modern tinplate renditions of older Marx trains. These are not reproductions and are mechanically different from the originals. Yet plenty of originals are out there. And the originals are the most affordable collectibles around!
Marx may have sold more trains, but it sold them as toys. In actual fact, Marx was never out to dominate the world of toy trains. There was a relatively small core of locomotive and car types. Variations were more accidental than anything else. The original Marx trains never matched Lionel in the number of locomotive types, car types or road names.
The pre-1942 tin locomotives were but a handful of types: Mercury, Commodore Vanderbilt, 897, 898, 994, Canadian Pacific type, Union Pacific Streamliners, the 999 diecast steamer and the very cheap 591. Postwar was equally sparse: the #666 diecast and #1666 2-4-2 steamers, #333 diecast Pacific and #1029 plastic Hudson, #400 and #490 cheap steamers, and the E7, S3 and 70-ton diesels. Lionel made ten different locomotive types for every one made by Marx, not to mention a much wider array of road names and liveries.
Marx kept it simple, producing a small variety from an equally small core of model types. There were only a few road names. Part of the sparsity was Marx's own cheapness. When requesting permission to produce a road name, he'd often be asked for a few complimentary sets in return. Marx refused.
This is not to say that railroad companies were all alienated. Seaboard Coast Line paid for the tooling of the double-door deluxe boxcar, which was to be sold as a model of one of their trains. Seaboard was promoting freight service via those cars at the time. It was common for railroads to allow and even pay toy train companies to make models in their liveries. The Santa Fe and New York Central anted up considerable funds to Lionel to have the F3 made in their colors first.
The most common road names among Marx locomotives are the New York Central, Santa Fe, Union Pacific. Western Pacific and Southern Pacific. In freights you will find the same names, plus Baltimore & Ohio, Rock Island, Penn Central and Erie. One non-road is Allstate, a trademark of Sears used in making sets for the catalogue vendor.
The original Marx trains were made by Girard, a Pennsylvania company. The "Joy Line" trains were about as toylike as one could get. This was common in the 1920s. Toy trains looked more like toys and models of the real thing. Marx took over Girard and made a few changes. Though they remained toylike, the Marx-designed trains looked more train-like than the Joy Line. It was in this era that certain characteristics emerged which are peculiar to Marx trains.
1) Motor: the Marx motor is basically and open-frame, AC motor block. To it are affixed two axles with wheels. There are subtle variations, but the basic design remains the same,. Better grades of train had brass bushings, while the cheapest lines had a bare-bones motor without E unit or lights. Nonetheless, the basic Marx motor remained pretty much the same throughout production.
2) Fat Wheel: early Marx trains had a single reduction gearing, the result being drive wheels geared inside the flange. These "fat wheels" show up as late as the early 1950s. They make it impossible for the locomotive to negotiate Lionel switches and crossovers.
3) Copper shoe pickup: the center rail pickup on a Marx motor is basically a simple copper strip, called a "pickup shoe." It was cheaper to make than roller pickups, and is features on Marx trains right up to the end. The shoe glides over the top of the rail, buffeted by a spring. The shoe makes it difficult for some Marx trains to negotiate the five-rail Lionel operating track and switches. (Most can get through, provided they don't have a fat wheel.)
4) Tilt Couplers: the early Marx trains had simple tinge-and-slot couplers, which were common in toy trains. Marx experimented briefly with an "auto coupler", but it was more limiting than anything else. They finally hit on a "tilt coupler." This is a flat, dovetailed piece that "locks" by sliding onto another coupler. The tilt coupler is sheer simplicity, being a single molded piece. The tilt is incompatible with the Lionel-type knuckle coupler and pretty much everything else out there.
5) Tiny knuckle coupler: cheaper sets in the later years featured a one-piece knuckle coupler. It had to be coupled by hand. These knuckles are significantly smaller and incompatible with Lionel-type couplers.
6) Low Trucks: Once Marx adopted the "3/16 over O" principle, they tried to be as scale as possible. Many of their scale freights have a lower type truck with smaller wheels than Lionel. These were intended to be "scale" based on 3/16" rather than 1/48.
7) Switches: the older Marx switches are open, and lack the tight guide rails of Lionel. Made to accommodate the flat sliding shoe pickup, there are gaps which can trap roller-type pickups. (A quick fix is explained in another chapter). Later plastic switches overcame the gap, but provided for fat wheels.
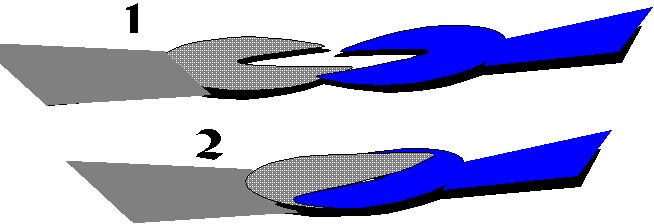 |
Tilt couplers dovetail into one another. Pressure from a simple spring and a notch on the end (notch not illustrated here) hold them together. |
 |
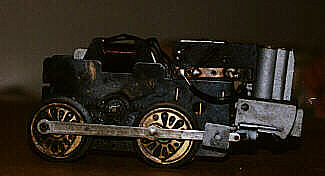 |
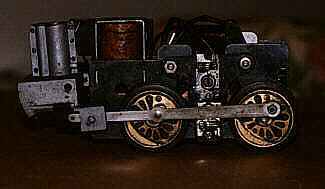
This motor has a smoke unit (grey piece). Behind it is the E unit (brown piece)
Original Marx trains have a basic type of motor which is pretty much consistent. Differences are in materials or minor details. Essentially, it is an open-frame AC motor. The axle of the armature has a gear affixed on one end. That gear is meshed with others which drive the wheels.
Most Marx motors have a simple directional device known as an "E" Unit. The E unit is engaged every time the motor is turned on and off. Each time the E unit is engaged, it changes the direction which the train will go. Modern O Gauge E units tend to have a third stage: neutral. Marx motors only have forward and reverse.
A few cheaper trains can only go forward. They do not have an E unit.
The better steam locomotives included a "smoker." This device heats smoke fluid, thus producing "smoke" through the smokestack. It gives the effect of a smoking steam locomotive.
Most original Marx motors have a metal frame and metal gears. Only a few later models had plastic frames and gears.
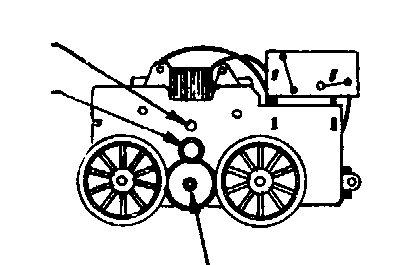
Lubrication points |
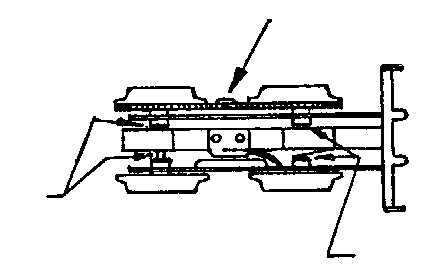
Lubricate axles |
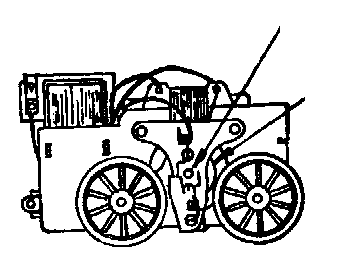
Lubricate motor |
The first thing to do is remove the motor block from the body shell. Then, wipe it clean. I prefer to use a citrus-based cleaner like Goo Gone on the frame. Next, spray TV tuner spray on the brushes and armature. Get some into the armature well. Spin the wheels a few times. Let the motor stand for a while, then repeat this process.
You can do more, but only with motors having metal frames and gears. Spray inside the armature well with WD40. Spray it well, then let it sit a while. Wipe clean.
Always make sure to spend extra time on the commutator, that small copper plate on the armature. Keep it clean and free of oil and dirt.
To lubricate, use grease. Do not use oil. Grease the armature shaft on both sides of the frame. Grease the gears, then spin the wheels. Do not overdo the grease. A little goes a long way.
Make sure to clean the wheels and the copper pickup shoe. I use the citrus cleaner for this.
After letting the motor sit and drain, place it back in the body shell. Run the train at medium speed on an oval of track. The locomotive may balk, go in only one direction or have a rough start. Keep running it for at least twenty minutes. Even if it refuses to change direction at first, a brief run may be enough to restore full function. I recommend that a newly refreshed motor be run daily for a week or so to get it back into shape. This is the same as breaking in the motor.
If your motor does not run, or runs only one way, it may need help. Tap the top of the locomotive. This will release a stuck E unit. Like it or not, some of these units stick from time to time. If that does not work, get help. Find a local O Gauge club. The members usually know some simple repairs, and they won't charge for it. Repairs from hobby shops can cost $30 and more.
Marx switches are simple. Whether the old all-metal or new plastic types, their wiring is similar to that found in two-rail switches. Three wires go to the switch itself. These are red, green and black. Black is the center wire, and it functions as a "ground," of sorts. Inside the switch is a solenoid. When the controller button is pressed, a circuit is completed that invokes the solenoid, thus operating the switch. The red and green wires determine the polarity, making the solenoid pull to one side or the other.
Two wires from the controller connect to terminal wires in the transformer. Thus, a switch can be operated without track power being on. Modern HO and N switches work the same way.
If the switch operates "backwards," just reverse the red and green wires.
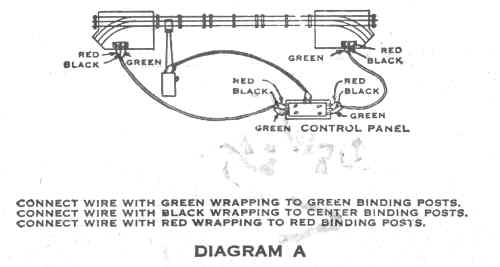
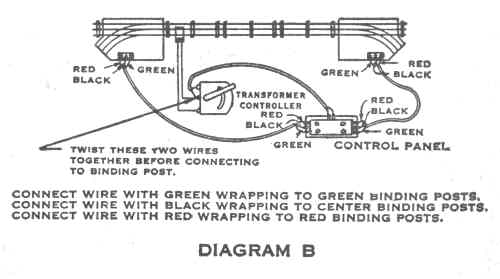
You will encounter two types of automatic switches, both wired similarly. The main problem is not wiring, but track configuration. Just as older Marx trains cannot handle Lionel switches, so most Lionel locomotive cannot handle an unaltered, older Marx switch. The problem are the gaps in the center rails. Lionel rollers will get caught in there. The quick fix is to insert track pins as shown. Make sure the pins are in far enough to allow smooth operation, yet not so far as to leave a gap.
Note that some MTH illuminated cabeese have problems with an older Marx switch, even if it has been altered.
On the modern plastic switches, you will notice that the guide rail has a spring-loaded detent. This piece slides to allow fat wheels passage.
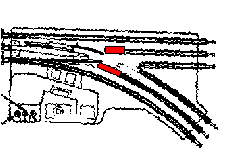 |
The trick to using older Marx switches with Lionel trains is to inset track pins as shown (red). They must extend without impeding the operation of the switch. |
In a pinch, you can use Atlas or other HO/N switch controllers. They work the same: three wires to the switch, two to the AC terminals on the trannie.
Marx switches come in 27" and 34" modes.
Marx track is of the O27 variety, having a rail height between 7/16 and 1/2". This profile is lower than standard O Gauge tubular rail. Marx curves come in two sizes, 27" diameter and 34" diameter. The 34" rail is less common. Marx trains will run on all O27 and O Gauge track.
Marx straights were initially 10" long, which is standard for O Gauge. (Standard for O27 is 8 3/4" to 8 7/8")
The track consists of the rails joined by metal crosspieces. These cross pieces are called "ties." You will notice that the center rail is insulated from the crosspiece by a sliver of cardboard or fiber. Rail is joined by pins.
Let's be blunt: some Marx track held up well, some did not. Rust is a common problem. Replacement track is cheap. It is cheaper to buy new O27 track than try to restore rusted rail. Lionel and K-line track are compatible with Marx. The differences are thus:
Lionel and K-Line track use a standard 8 3/4" to 8 7/8" straight piece, as opposed to Marx's old 10" length.
Lionel and K-Line come in curve diameters of 27", 42", and 54". Marx diameters are 27" and 34"
Lionel and K-Line produce full-sized O Gauge track on 31" diameter. It is the closest thing to 34" Marx track, although the profile is higher and the tubular rail is wider. O27 track can be shimmed to join with O. If you must mate with O, it is better to use O27 sized pins and crimp the O rail, rather than force the thicker O pins into narrow O27 rails.
Lionel and K-Line O track length is a standard 10" If you need a 10" rail to replace Marx, use Lionel / K-Line O.
The basic wiring to Marx track requires four things: track, two wires, a transformer and a lockon. The lockon is a clip that engages the center rail and one outer rail. It has to wire clips on the side. Wire runs from these to terminals on the transformer. Marx lockons were pretty spare, and are best replaced with modern ones by Lionel and K-Line.
Click here to see instructions for setting up Marx and other tubular track
Except for a couple of oddball sets, like the Lehigh Valley #112 70-tonner switcher, Marx O runs on AC power. O, S and Standard gauges are the only ones that use AC. HO, N, G / Large Scale and 2-rail O use DC.
Marx's transformers were usually very basic. Only a few had built-in circuit breakers, and very few output more than 30 watts. Marx sold a separate circuit breaker that was attached between the transformer and the track. Unfortunately, this is not the safest way.
If your Marx transformer has a built-in reset button,. That means it has a built-in circuit breaker. If it does not, consider replacing it with a safer model from Lionel or K-Line. We have found that the small K-Line "train set" transformers work well with Marx. They pack out about 40 watts of power. The new K-Line 100-watt transformers have more than enough power to handle Marx trains. MTH transformers work well, although the 40-watt Lionel train set transformer is unreliable for Marx trains. If you use Lionel, use a transformer of greater than 40 watts.
Old transformers can be the dickens, so check them well. Make sure all cords are intact. If there is rust, you might do better to replace them. Safety first!
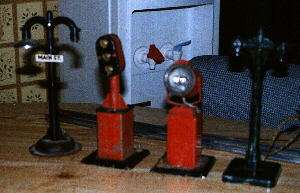
Marx made quite an assortment of trackside accessories, from simple signals to barrel loaders. Most work on track power. A few have been recast by K-Line, such as the barrel loader, diesel fueling station and operating switch tower.

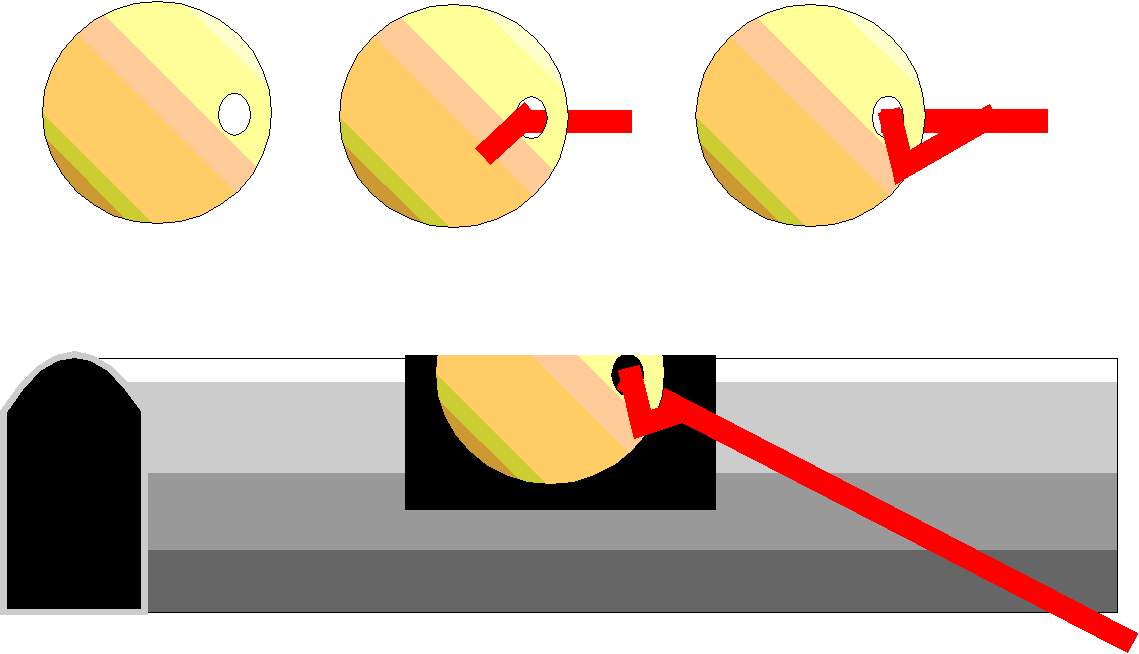
Marx crossing signals and block signals are track-activated. The flasher lights, bell ringer and semaphore are prime examples. The wiring is ingenious. Each has accessory-to-track wires with a bent metal plate. The plate is affixed to the top of the outside rail, closest to the accessory. Another wire connects to the center rail. A train entering that rail completes a connection with the opposite outer rail, thus powering the accessory.
The bell-ringers and flashers are amazing. Each time a wheel hits the plate, it causes the light ti flash and / or bell to ring. Items like semaphores have longer plates, so that the item remains in operation while a whole train passes.
BUT what if your accessory is missing plates? Flashers can be connected to a Lionel 154C connector. A new plate can be made easily, with thin copper plates. Poke a hole in the plate and affix wire. Place black tape over the rail, then bend copper piece over the tape. Make sure it is flush and does not impede wheels passing over it.
For accessories using longer rails, try insulated rack from Lionel or K-line. In these, one outer rail is insulated. Just insulate with fibre pins and connect by a lock-on, making sure you contact the insulated rail.
Click here for Marx Accessory Instructions, tips and tricks
Marx accessories are usually affordable. They add plenty to a railway, so by all means, find them and use them.
You can use the vast majority of other O Gauge accessories with Marx trains. Lights, signals and other track-activated accessories will do well. Many of the more animated accessories such as log loaders and coal loaders work fine with Marx. Track is compatible, even if the switches don't always mate with the trains.
You can use Lionel trestles with Marx track, as well as most bridges and structures. Since the Marx trains tend to be smaller, you won't have much of a problem with clearances.
Marx trains can be scenicked just like any others. Because they are smaller than Lionel or Railking, you might want to make one small concession to size. Most O Gauge is scaled at 1/48. Marx is scaled mostly at 1/64. You can use 1/64 scale scenery to good effect.
Original Marx buildings for scenery were scaled at 1/64, even though the plastic people are a full 1/48. K-Line produces several of these building sets. They include: gas station, police station, airport, school, ranch houses, supermarket, water tower, fire house, diner, factory, farm buildings, church, and stations. (The newer K-Lien storefronts are 1/48). The K-Line cheap plastic cars are about 1/64, too. They are all recasts of Marx models. (Plasticville, a competing brand, tends to have doors and height at 1/48.)
Ertl makes several 1/64 farm sets wit hall of the accessories. Most American Flyer is 1/64, as well. Needless to say, 1/64 diecast cars are common these days.
Original Marx trains have a basic type of motor which is pretty much consistent. Differences are in materials or minor details. Essentially, it is an open-frame AC motor. The axle of the armature has a gear affixed on one end. That gear is meshed with others which drive the wheels.
Most Marx motors have a simple directional device known as an "E" Unit. The E unit is engaged every time the motor is turned on and off. Each time the E unit is engaged, it changes the direction which the train will go. Modern O Gauge E units tend to have a third stage: neutral. Marx motors only have forward and reverse.
A few cheaper trains can only go forward. They do not have an E unit.
The better steam locomotives included a "smoker." This device heats smoke fluid, thus producing "smoke" through the smokestack. It gives the effect of a smoking steam locomotive.
Most original Marx motors have a metal frame and metal gears. Only a few later models had plastic frames and gears.
The first thing to do is remove the motor block from the body shell. Then, wipe it clean. I prefer to use a citrus-based cleaner like Goo Gone on the frame. Next, spray TV tuner spray on the brushes and armature. Get some into the armature well. Spin the wheels a few times. Let the motor stand for a while, then repeat this process.
You can do more, but only with motors having metal frames and gears. Spray inside the armature well with WD40. Spray it well, then let it sit a while. Wipe clean.
Always make sure to spend extra time on the commutator, that small copper plate on the armature. Keep it clean and free of oil and dirt.
To lubricate, use grease. Do not use oil. Grease the armature shaft on both sides of the frame. Grease the gears, then spin the wheels. Do not overdo the grease. A little goes a long way.
Make sure to clean the wheels and the copper pickup shoe. I use the citrus cleaner for this.
After letting the motor sit and drain, place it back in the body shell. Run the train at medium speed on an oval of track. The locomotive may balk, go in only one direction or have a rough start. Keep running it for at least twenty minutes. Even if it refuses to change direction at first, a brief run may be enough to restore full function. I recommend that a newly refreshed motor be run daily for a week or so to get it back into shape. This is the same as breaking in the motor.
If your motor does not run, or runs only one way, it may need help. Tap the top of the locomotive. This will release a stuck E unit. Like it or not, some of these units stick from time to time. If that does not work, get help. Find a local O Gauge club. The members usually know some simple repairs, and they won't charge for it. Repairs from hobby shops can cost $30 and more.
How do you try to revive a Marx locomotive? The process is easy. First, lay out a small oval of track and hook it up to a transformer. Place track on something that cleans up easily. Then, you will need a screwdriver, needle-nose pliers, soft tooth brush, TV tuner spray, citrus cleaner (such as Goo Gone), and lubricant. If your model has a motor with metal gears and plates, you might also want some WD-40.
First, remove the screw that holds the locomotive into the shell. Begin by wiping away any noticeable dirt. Use the citrus cleaner to clean the inside of the shell and the outside of the motor and wheels. Don't get citrus cleaner outside the shell, as it may clean off the lettering. A soft cloth with soap can be used on the outside.
Spray the inside of the motor with WD-40 (only if it is all metal.)> Spin the wheels a few times and spray it some more. Then let it sit a while. You can repeat he process if you think it is necessary.
Wipe off the commutator. Spray the motor, commutator and brushes with TV tuner spray. If necessary, use a stronger cleaner on the commutator. Let it sit a few minutes.
Lubricate the center axle and the gears. Use model railroad lubricant, not oil! If you don't have lubricant. You can use petroleum jelly. Spin the wheels to assure that everything is lubricated.
Replace the shell and try the locomotive on the track. It may go only one direction, it may not. Initially, let it run for ten to fifteen minutes. Then, try running it in the opposite direction. Tap the top of the shell above the E unit if it sticks in one direction. Run your train for a while, so as to let it revive itself.
If your locomotive does not run, it might be the E unit or a wiring problem. This requires a bit of expertise, so ask someone who knows how to fix trains. Most O Gauge clubs have such individuals. You could take it to a hobby shop to be repaired. However, repairs generally cost $30 and up. That might be more than the cost of your locomotive! Your best bet is to ask the local train fan or O Gauge club first.
If your locomotive or car is a mess, there is no point trying to maintain collector value. Repainting is an option. While several books cover a complete restoration, a quick paint job can be had using simple tools. First, take the motor out of the shell and remove any parts like handrails, lights and domes. Make sure the loco or car is clean. Clear away rust with a wire brush. Scrape away flaking paint. You can cover marker lights with masking tape. Then, use a paint that is intended for the material. Different paints are made for metals and plastics. You can airbrush or spray paint. Get an even coat, not to thick! Allow your train to dry. I recommend gloss or satin finish for tin trains, satin or flat for diecast locomotives, diesels and cars.
Decals can be a big help. I recommend that you use O Gauge or S Scale decals. O Scale is too big, since Marx trains tend to be scaled at 1/64 rather than 1/48. Several parts vendors sell decals for O Gauge, such as those used on Lionel trains. Most of these are sized fine for original Marx. Keep in mind that we are not making perfect prototype replicas here. If you want prototype, consult books which explain fine scale model work.
I have found that flat paints are great for freights, especially boxcars, stock cars, reefers, gondolas, hoppers and flat cars. Several brands of model railroading colors are out there. There are military flat spray paints which are excellent for trains, too. Keep in mind that most railroad cars are almost "standardized." For example:
Black is the most common color for gondolas, hoppers and tank cars.
"Boxcar red" is the most common color for boxcars, stock cars, reefers and flats. It is the second-most common color for hoppers and gondolas. "Boxcar red" ranges from maroon to brown. The color is not always consistent in the real world.
Red is by far the most common color for cabeese. Most roads had red cabeese in their fleets, even if they also had some in special colors. Second to bright red is maroon.
Common colors for tank cars include black, silver and white.
Black is by far the most common color for steam locomotives and tenders. Very, very few steamers were painted in other hues. These few were usually special trains, like the Jersey Central's "Blue Comet". Black is also most common for diesel switchers.
The Pine Creek Railway is a narrow-gauge museum. They use an astounding variety of car types, not to mention an unusual assortment of locomotives. One problem they have overcome is the incompatibility between different types of couplers. One of their many tricks is the "idler car." It is a car fitted with one type coupler on one end, and a different type on the other. It enables the folks at Pine Creek to link cars that would otherwise be incompatible.
For instance, what if the locomotive were fitted with a knuckle coupler, and there were a string of cars have the hoop/hook type? The Pine Creek Railway could insert a small car with a knuckle coupler on one end and a horn/hook on the other.
We can use the same basic technology in several ways. It is very easy with steam locomotives. Tenders, which are numerous for original Marx trains, can be idlers on their own. I made my first by replacing the rear truck on a slope tender with a Lionel type that had a knuckle coupler. I also maintain a fleet of extra tenders that have various Marx couplers: tab and slot, tilt and knuckle. By having extra tenders, one steam locomotive can be used for whichever coupler my cars may have.
For regular freights, you might take a sample of the more common car types and make it an idler. Make one that will handle modern couplers and the tilt variety, since most plastic original Marx cars have tilt couplers. You might also make an idler with a tilt and Marx-type knuckle coupler.
What about passenger cars? If you are running original Marx passenger cars, get a Marx boxcar. Paint it as an express boxcar, as per the type used by the road name on your passenger cars. One coupler on the boxcar will be compatible with your cars, the other with the desired locomotive. Obversely, you can use Marx diesels to haul your modern passenger cars by making one end of the boxcar a tilt coupler, and fitting the other with a modern coupler. Express boxcars are common sights. Should you prefer, you can also use a K-line deluxe boxcar with one end fitted with a tilt coupler.
Idlers can be used in the center of a train, so that you can combine a string of one coupler type with a string of others.
A peculiarity of some railroads was for a crew to haul a caboose, even on switching moves. The caboose would make a fine idler when handling two different coupler types. The crew can keep it hooked to the locomotive while moving cars with incompatible couplers, then leave it on a siding while moving compatibly-fitted cars.
Alas, most original Marx cars sold second-hand have lost their loads. Several parts vendors sell recast loads. You can just as easily make a few loads of your own.
Coal and Gravel loads: some folks think it is a god idea to load hopers and gondolas with miniature coal or gravel. One derailment and they end up with a mess. A time-tested trick of experienced model railroaders gives the appearance of a full load without the spillage. You will need a thin sheet of Styrofoam or balsa wood, black paint, glue and miniature coal / gravel /etc.
1) cut the foam to fit tightly inside the hopper or gondola. It should fit about 1/4" to 3/8" below the rim of the car.
2) paint the top and sides flat black.
3) Apply glue liberally, covering the entire surface.
4) Now pour on the gravel, coal etc. Let it set for several hours. Then, just turn it over, shake to release any excess coal, and you have a lightweight, spill proof load. Slip this into your car.
Open hoppers and gondolas often carry coal, gravel, sand and other granular substances.
Gondolas: the workhorse of the railroad, gondolas can carry more than granular materials. They are used to carry anything that fits. You can fill them with crates, pipe, pig iron slugs, scrap metal, lumber.....whatever fits!
Pipe load: use tubing or straws. Make a fitting as shown, with cutouts in the diameter of the pipe. Fit these at each end, about 1/4" from the end of the pipe, and put another in the middle. You can stack them in a gondola for a realistic pipe load. The same load can also be used on a flat car.
Iron slugs: take plastic or other substance and cut slugs 1/8" to 1/4" long. Paint them a steel color, or use steel-colored plastic. Black will do in a pinch. (You can paint them before cutting). Next, give them a wash of rust. Use a dark orange flat paint and thin it. Acrylics are best. Pour it over the slugs, them pat them gently with a paper towel. This makes the look rusted. Now, use the same trick we did to make a coal load.
Scrap metal: any kind of scrap metal can be a gondola load. Use old locomotive parts of model car parts, perhaps. Paint them to look like rusting metal.
Wood load: get a bag of small balsa strips and cut to length - about 8 to 12 scale feet. (For 1/64, that would be 3" to 4 «"). Stack then anywhere from «" to 3/4" high. Width should be such that there is about 1/16" between the load and the wall of the gondola on each side. Make sure to place bracing boards underneath, and straps to secure them. You can also use thin strips of balsa, as shown.
You can also stack unfinished wood, such as firewood. Logs can even be stacked lengthwise.
Barrels: Yes, barrels can be stacked in gondolas, either upright or on their side. Keep in mind that when stacked sideways, the bottom of the highest row of barrels must sit at least 1/8" lower than the top of the gondola. When stacked upright, at least « the height of the barrel must remain below the top of the car.
Flat car loads: Flat cars carry items that won't spell. Thus, lumber and pipe loads are usually secured in some fashion.
The wood and pipe loads mentioned above are great flat car loads. If you have a bulkhead flat, you can stack log loads. Logs ought to be slightly shorter than the width of the car, and stacked as shown.
Though auto-carrying flat cars are popular with O Gaugers, cars are rarely shipped by flat car. The vehicles most likely to be on flats are military equipment, MOW vehicles, and a few odd types of construction vehicles and heavy trucks. For Marx and other O27 trains, try to use 1/64 scale vehicles. Do not use anything smaller in scale! A 1/64 vehicles is right. Try to have tie-downs made of black thread, or even of small clock chain.
Flats are used to carry everything from motors to massive injection molding machines. Check around for unusual loads. You can make a very interesting addition to your consist by loading your flat cars with unique, realistic items.
Passenger Cars: the original Marx passenger cars are a small assortment, indeed! If you want to spice up your passenger car fleet, there is not much you can do with original cars. Your choices are limited to New York Central, Santa Fe, and Western Pacific for scale cars. For the Wild West it's Saint Paul & Pacific, and in the four-wheel cars you have New York Central, Canadian Pacific and the red Bogota and Montclair cars. That is not much choice. To boost your passenger fleet, it pays to look elsewhere.
One type car that goes great with original Marx is the K-line semi-scale Streamliner. These O27 cars are the right length and height for the larger original Marx steamers and the E7 diesel. You can use an express boxcar as an idler. Equally good are the Lionel type O27 Madison cars, known as "baby Madisons." The longer 15-inch Madisons work well as 80' cars, by the way. I've found them a bit heavy, compared to the K-line cars.
You can run three or four K-line passenger cars behind an E7, and two or maybe three behind the Triple Six steamer.
Original Marx on the shelf? There are some cars out there that are compatible with original Marx. Among these are the K-Line crane and crane tender caboose, both of which are recast from original Marx molds. K-Line's deluxe cars are mainly Marx recasts. The K-Line train 19 caboose is compatible in size, as well. Industrial Rail's cars also do well, especially their plain and work cabeese. A good stock car is the O27 Lionel animated horse car.
K-Line recasts many Marx accessories, including the operating barrel loader, operating diesel fueling station, operating switch tower and operating crossing gate. K-Line street lamps are Marx recasts, too. In their line of K-Lineville buildings, you can find Marx as the supermarket, police station, school, fire house, airport hangar, L-shaped farm house, ranch house, colonial house, farm and barn, church, water tower, grade crossing, unpainted people and farm animal figures, cars and telephone poles.
K-Line's S2 switcher and RDC are based on recast Marx body shells. The train set 4-6-2 was originally a Marx mold. That mold has been remade.