(Most automatic and operating cars are variants of those illustrated in this section Often, people inherit or buy old trains with operating cars. Instructions are not always included. We hope this section will be of special use to them.)
Most train outfits contain at least one automatic car which is unloaded or otherwise operated by means of the same remote control track section used for uncoupling. The only exception to this is the Stock Car, which is described later.
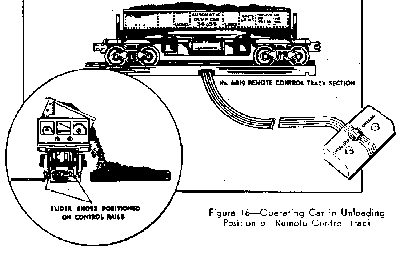
The mechanism of most unloading cars, such as the Milk Car and the Coal and Lumber Dump Cars, is powered by a built-in electrical coil, or solenoid which gets its current from the track through the two sliding contact shoes on the bottom of the car. To operate such cars position them on the remote control section so that both contact shoes rest on the auxiliary control rails (See Figure 16). Then press "Unload" button on the controller.

If a dump car is heavily loaded, or if track voltage has been reduced to slow down the train, the car mechanism may operate sluggishly. In such cases increase the track voltage until the car operates satisfactorily.
The proper cargo is supplied with all dump cars. In Coal Dump cars use only O Gauge Artificial coal. Any other material such as sand, etc. will tend to clog the operating mechanism of the car.
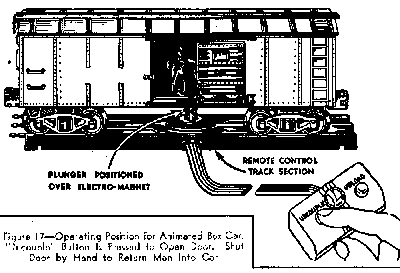
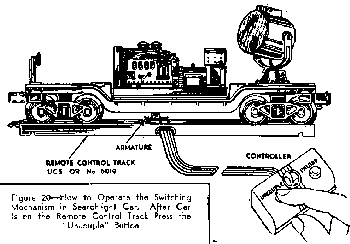
Operating cars such as the Animated Box Car and the Searchlight Car do not make an electrical connection to the auxiliary rails. Instead, their mechanism is operated when the iron plunger, or armature, projecting from the bottom of the car is attracted by the electro-magnet in the remote control section. To operate these cars position them on the remote control section so that the plunger is directly over the electro-magnet (See Figures 17 and 20); then press the "Uncouple" button of the controller. Cars can be operated either while they are standing or in motion, by pressing the controller button at the right moment. In the Animated Box Car, to get the man back into the car shut the open door by hand. In the Searchlight Car the light will continue burning until the car is moved back to the remote and operated again.
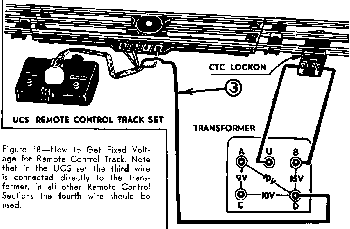
The Remote Control Section is usually supplied with track voltage. It is possible, however, to connect it so that it will receive a fixed voltage directly from the transformer. To do that one of the four wires leading from the controller must be disconnected from the remote control section, and connected instead to a fixed voltage post on the transformer. On UCS sections this wire is No. 3; on 6019 section, it is No. 4. The transformer connections for such an installation are the same as for the Fixed Voltage Plug on 022 Switch (see Using Track and Switches)
Install the unloading platform provided with the Milk Car next to a remote control track section, as shown in Figure 19. When used with "O" track the floor of the platform should be inserted into the top "A" slots in the frame; when used with "027" track the Floor should be fitted into the bottom slots "B" Simply pull out the floor platform and insert it into the proper slots and the corresponding notches on the side of the framework facing the track.
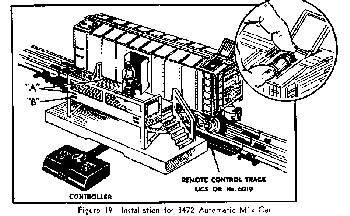
The miniature milk cans furnished with the car are loaded into the car by hand through the hatch in the roof. (See inset in Figure 19). Do not try to load any more than 7 cans into the car. Press "Unload" button of the controller to unload cans. Adjust track voltage until milkman unloads the cans vigorously but without knocking them over. The small magnets in the bottom of the cans help to keep them upright.
NOTE: current versions of the Milk Car, such as the Lionel Cola Car, have plastic cans with metal bases. These tend to jam. Vendors of O Gauge parts usually carry all-metal cans, which are far superior and do not jam.
The Operating Stock Car, which loads and unloads miniature cattle from a special corral platform does not use the regular remote control track but is operated instead by means of contacts built into the platform base. The platform base is assembled to a straight portion of the track (either "O" or "027" track may be used) and is wired to a track lockon and to a No. 364C Controller, as illustrated in Figure 22.
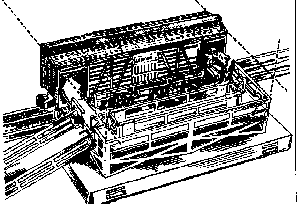
After the platform is properly assembled, line up the miniature cattle in any desired corral passage, position the car accurately in front of the platform and press the controller button. The car doors will open and the vibrating platform floor will cause the cattle to move into the car. If the sliding center car door on the opposite side of the car is left open, the cattle will pass through the car and come out again on the platform. If the sliding door is closed, the cattle will remain in the car.
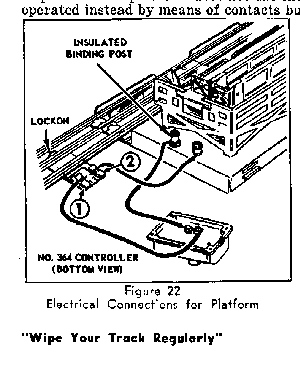
This car does not use the regular remote control track but is operated either by means of an OTC contactor on "0" or "027 track or by a "Super-0" control blade. Both the corral and the OTC contactor or control blade are then wired through a 364C controller either to the center rail of the track or directly to a fixed voltage post of a transformer.
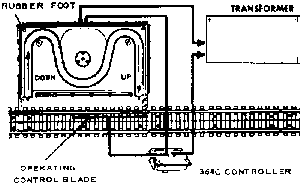
When the car is aligned in front of the corral and put into operation by means of the 364C controller, the car ramps will drop down to meet the corral and miniature horses will troop out of the car, around the corral enclosure and back into the car. The car will operate only when it is in correct position, with the ramps facing the corral.
The height of the corral platform is adjustable for use with "0" or "027" track by reversing the rubber feet under the platform. "Super-O" track uses "027" adjustment.
NOTE: the operation of the Horse and Cattle cars are virtually identical. Recent reissues of the Cattle Car have included the Horse Car platform.
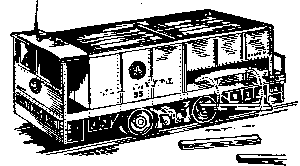
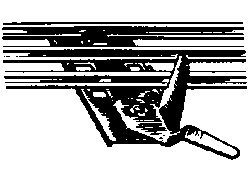
The Tie Unloading Car is equipped with its own motor which enables it to run on the track as an independent track repair unit. A coupler in the rear enables it to pull another car, which can be used to carry extra track ties, etc. The ties, which are furnished with the car, are loaded into the rear compartment of the car by hand. As the car runs along the track it will eject track ties, one at a time, along the railroad right-of-way The unloading action is started and stopped by means of a pair of track-side trips, which are clamped to the track, as illustrated below. The lever on the track trip can be used to move it out of the way, if desired.
Some of the earlier trips were made to fit "O27" and "0" track. However those produced later fit all track including "Super-O" track.
The Giraffe which is being transported in this box car has his head protruding through the roof hatch. When warned by a "low-bridge" signal, the Giraffe drops down to avoid hitting the obstruction. After passing the obstruction the Giraffe rises again.
This action takes place when car passes over a cam plate which is placed along side of a straight section of track(or on the inside of a straight and curved section). The illustration above demonstrates the how to install the "low-bridge" signal and cam plate. The car operates efficiently in either direction.
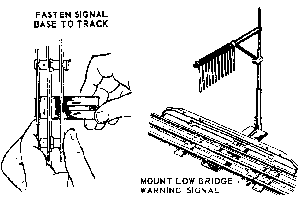
Note: The base of the "low-bridge" signal cannot be installed on a regular "Super-O" track section, but must be mounted on special No.38 Accessory Adapter Track sections available from your dealer.
The dumping mechanism of the Lumber Car is operated by a cam which raises the unloading frame of the car gradually, in steps, until the logs roll off. The cam rises a step every time that the controller button is pressed. After reaching the highest point, the frame drops back to its normal position. To bring the cam around to the point where it will begin to raise the unloading frame again, the button must be pushed seven times.
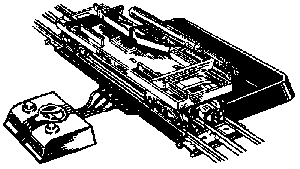
The Lumber Car is equipped with a pair of slide contact shoes and can be operated either on No. 6019 or Type UCS remote control track section, on a pair of OTC track contactors, or, if "Super-O" track is used, on a pair of No. 36 Operating Blades inserted into any straight track section and connected.
Track Cleaning Car is designed to do a double job of washing and drying the track rails. To wash the rails squirt a small amount of track cleaning fluid from the plastic squeeze tanks supplied with the car into the funnel on top of the car; then switch on the washing head motor. Couple the track cleaning car to a locomotive and let it make several circuits of the track.
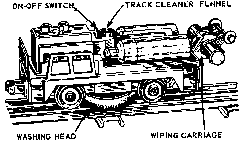
To wipe the track dry, pull out the washing head, lower the wiping carriage so that the cotton wiping cylinder rides on the rails and let the car make a few more circuits.
A generous amount of special track cleaning fluid and wiping cylinders are supplied with the car; additional quantities may be purchased from your hobby dealer.
Caution: For washing the rails use only the new noninflammable, non-toxic track cleaning fluid. The large surface of the washing head sponge greatly increases the flammability of any inflammable fluid. For that reason no inflammable cleaner should be used.
The two dumping sides of this car tilt alternately, rising a notch every time the controller button is pressed. If you are unloading the car into a track-side storage bin, Loader or Coaling Station, you will have to move the car over about one-half of its length after one side has been dumped so that the second side can he dumped into the same bin. For this reason, the regular remote control track sections are too short and 2 OTC contactors are furnished.
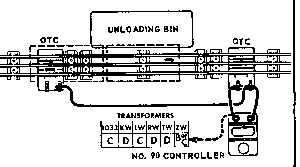
The contactors or operating blades should be about 18" apart so that one of the car's sliding contact shoes is on a control rail in both of its operating positions. The contactors are connected together and to No. 90 Controller. If the controller is connected to the two clips of the OTC contactor the car will receive track voltage. For fixed voltage wire the controller to transformer instead of the OTC contactor as shown by dotted line.
To prevent accidental dumping action when cars are uncoupled, there is a lock located in the under-frame of the car.
Click here to return to Basic O/O27 Manuals Index
Click here to return to Main Page