Here are several more layouts. These are quite basic, and are intended mainly as a foundation for expansion into larger layouts. They work in almost any scale, provided you have the room and the materials.
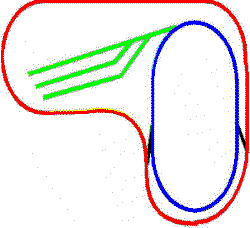
My old O gauge layout from the 60s and 70s - this simple system offered a lot of fun and innovation. It is basically a large "L" enclosing a long oval and a small freight yard. There's nothing complex here! We used to treat the Red line as the main, the Blue as an intermediate, and the yards as the destination. Kids get a lot of mileage out of the "L in L." It is named for a LOOP inside an L

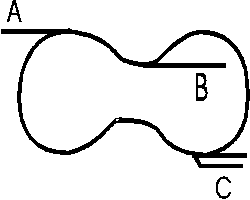
This is nothing but a lazy oval that dips inward at the middle. (No, it is hardly "drawn to scale".) The inside siding at B is mainly for appearances - it looks good. A and C are conveniently placed for future expansion. These sidings easily become a connection from which to expand your layout. Nothing fancy - just a good foundation.
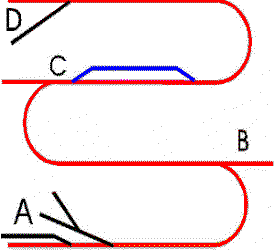
This layout looks like a switchback. In fact, it's based on the layouts of logging and mining roads. You can have a lot of fun with it, especially if you're running two or more trains at once!
The beginning of the layout, A, has a regular siding at the end which can connect to a mainline railroad. The smaller Y-shaped siding is for an engine house and MOW. Point B is a siding that can also be used for passing, while C is a regular passing siding (can be placed on higher or lower loops, as you desire). D is the terminus. You might wish to ass a Wye, reversing loop or turntable at D and A so locomotives can "come about." This layout looks great with smaller steam locomotives.
Commuter - Interurban - "Staten Island RR, Steam Version"
We took Layout #1 and enhanced it by terminating all ends with reverse loops. This makes it easier to operate with steam. Instead of a "wye" or turntable, a simple loop keeps the engine up front as it retraces its path back to the opposite station. We removed the usual sidings, which can be added by the operator as he wishes.
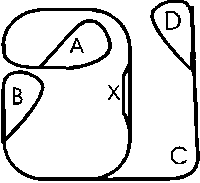
Steam adds a few new elements to the Staten Island RR layout. Initially, this operation was meant for commuter, interurban or trolley cars. By placing a single coach behind a small steam locomotive (we used the Lionel 4-4-2 "Atlantic"), you get a turn-of-the-century commuter train much like those which ran on Staten Island. Reversing the train becomes a problem. Electric and diesel commuters, trolleys and interurbans only require the motorman to move to the control cab at the other end of the train. Diesel locomotives pulling coaches can resort to "push pull" like NJ Transit: on the return journey, the locomotive becomes the rear of the train. The opposite end has a motorman's station on a passenger car. The only one that moves is the engineer/motorman. Steam cannot easily accommodate a "push-pull" for long distances. Therefore, reverse loops assure that the loco always has the forward position.
Steam adds a few more factors. At each end, you need a water tower and coal facility. MOW can be steam or a diesel switcher, and can handle more "push-pull". The problems of refueling after every run or two is but one way that steam adds more challenge.
This layout is an expansion on #12 The Starter. A Green line serves the East end, and the Blue serves the West. By adding a few spur lines, we have an altogether different point-to-point operation that is great for commuter, switching or short run operations.
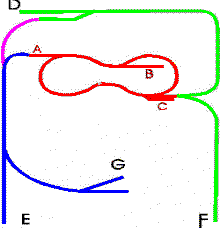
We show a suggested adaptation by adding a link - the Purple line - a direct connection between Green and Blue at the top. Other variations you might try include extending and curving E and F so that they meet. This would make a larger loop extending from and encompassing the Red. Or you may extend G's horizontal spur to connect with the Green line between C and F. "East to West" has potential for passenger and commuter work, light switching or unusual roads such as mining and logging. By assigning one train each to Red, Green and Blue, you have a challenging situation which gets even more intense with the addition of an MOW train, special drill or extra commuter.
Once again, we have built a larger layout around #13 The Starter. Look at the principle employed - a good, basic layout serves as the foundation to create a larger, more complex operation. Natural Conclusions is a variation that offers a lot of variety, ingenuity and challenge.
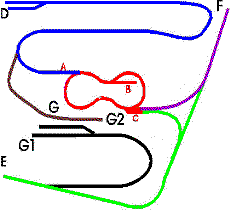
We envision natural obstacles that require our unusual layout. For example, the inside the upper Blue Line loop we imagine a lake. Our Blue line runs around the lake to serve a depot, customer or town at D. Coming off the lower Blue loop is the Brown Line, serving a mine, mill or lumber facility at G2. We imagine this being an industrial spur going to or around a hill, this it has tight curves. G is a station and passenger interchange connection with the Black Line, a commuter line. (Perhaps mine/mill workers ride the work train to G, where they catch the commuter train to home.) The Green Line serves a town at E and also provides commuter service to the resort or town at G1. A minor run is the Purple Line, a shuttle service to a town or industry at F.
If you follow our lead, you need short commuter trains (trolley, doodlebug, one-car passenger train), a loco with ore or lumber cars for each industry, and a small shuttle for the run to F. Within the Red line you can run a regular A to C to A trolley. There will also be a regular drill - perhaps a switcher and a few boxcars - bringing supplies to the towns and resorts. We figure this is a mountain region with lake resorts or skiing, as well as regular mining and or logging operations. That opens the way for a combination passenger/industrial/freight operation.
Click here for more information on Train Runners
 Click
here to return to the Station